- 精华
- 0
- 帖子
- 96
- 威望
- 0 点
- 积分
- 138 点
- 种子
- 0 点
- 注册时间
- 2009-3-23
- 最后登录
- 2015-10-14
|
不好意思,同时在做大多事,忙中有错,只有下面三个是要下的,另外一个不是。
FastLordBogami.RAR
hdl_dump_gui-2.1.zip
hdld_svr0.8.5.rar
配合他hdld8.5可以用2.4m的速度来安装,软件都传到临时上传文件了
Quote:
TOC:
A) The smart start window:
B) Basic Settings: The preferences menu
C) Installing a game onto PS2 hdd
D) Deleting one or more games from the PS2 hdd
E) Copying games form one PS2 hdd to another PS2 hdd
F) Copy a game from PS2 to PC
G) The Jobs in the QueueList A) The smart start window:
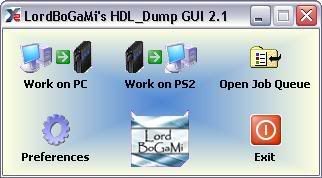
From this window you can choose which “part” of the program you want to start.
Depending on what you want to do you need to hit a different button.
Here’s a list:
Quote:
-----------------
Work on PC
-----------------
=> Rip an ISO from CD/DVD to Ps2 hdd
=> Send an existing Image to your PS2’s hdd
=> Make an ISO of your DVD/CD and store it on your PC
-----------------
Work on PS2
-----------------
=> Extract an ISO from PS2 to your PC
=> Delete games from PS2 hdd/ Format PS2 HDD
=> Transfer games from one PS2 hdd to another (PS2 hdd)
=> Print out a list of the games you have on your PS2 hdd
---------------------
Open Job Queue
---------------------
Lord Bogami’s GUI allows you to put the operations you want to perform (Iso copying, deleting, etc) in a queue list, so you can leave your PC/PS2 alone.
Open the queue list and click “start” if you want your previously chosen jobs to be performed.
---------------
Preferences
---------------
Set up your GUI here…
B) Basic Settings: The preferences menu
Hit “Preferences” to access LordBogami’s option menu.
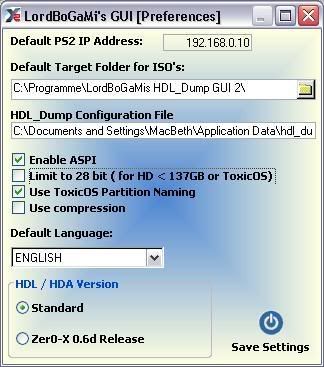
1)Setting the PS2’s IP.
Quote:
Note: This setting, of course, will have NO effect on your PS2’s settings. It will just tell LordBogami’s GUI which IP you have currently assigned to the PS2.
Simply type in the IP address of your PS2 in the “default PS2 IP Address” tab.
2)Setting the default ISo extract folder.
LordBogami’s hdldump GUI allows you to extract games from your PS2 hdd to your PC’s hdd.
In the preferences you can set the folder to which LordBogami’s extracts the ISOs from your PS2 by default.
Quote:
Note: you can change the folder you need to copy your games to even in the program’s main window.
In other words, if you choose folder X here, you won’t have to enter the preferences menu again if you need to copy a game to folder Y.
Again very simple: Browse to the target folder of your choice…
3)Common settings, especially the bit setting.
Leave the ASPI and Toxic partition naming enabled.
The compression should be disabled.
The “limit to 28 bit” option is only for ppl with hdds with LESS than 137GB.
If your HDD is larger than that, you need to UNCHECK this option.
4)The language setting.
This doesn’t need explanation, I guess…
5)HDL/HAD version
Check “standard”
C) Installing a game onto PS2 hdd
Quote:
Note: You should use IMGBurn or DVDDecrypter to make an ISO of your original game. This will make sure you get best ripping results. Tip:
If you want to know how much free space youhave on hdd then click the "work on PS2" button in the smart start window and hover over the blue "I" button
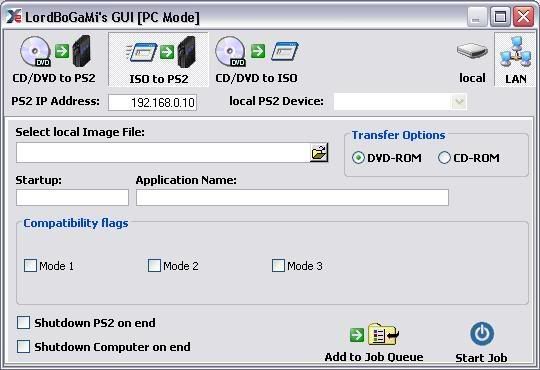
Click the "work on PC" button.
Click the "Iso2PS2" tab
In the upper right corner, choose either:
a) local PS2 drive (the hdd icon), if you have attached your HDD over IDE or USB
Quote:
Note: If you have more than one PS2 hdd attached to your PC, you may choose the one you need from the "local PS2 device" dropdown menu. b) LAN (obviously the other button), if you want to transfer your games over the network.
In this case you need to have the HDL server running on your PS2!!
Select your ISO using the "Select Local Image File" line.
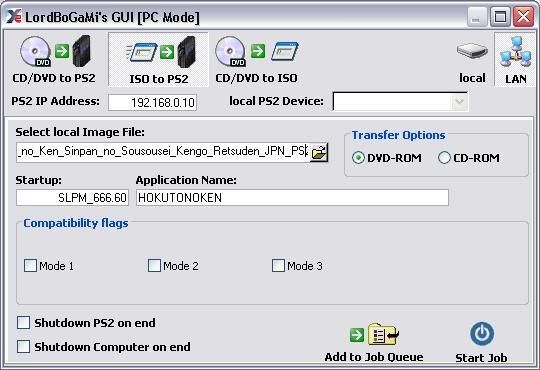
Once you've chosen it, the "Startup" and "Application Name" fields will get filled automatically.
Quote:
Note: You can change the "Application Name" as you please, BUT you must keep the StartUp entry!
The application name is hwat you'll see in the HDL games list! You don't need to use caps, even if when the fields gets filled automatically, the application name is shown in caps.
under "Transfer Options" set the type of media your game has been ripped from. You CANNOT change this setting in HDA/HDL, so set it correctly now.
Under "compatibility flags" you can set one of the first 3 HDL/HDA compatibility modes. Since you can also enable and disable modes directly in HDL by pressing select on the desired game, you may leave these settings blank.
Quote:
Note: Refer to this list in order to learn whether you need to set certain modes or not.
Also take a look at this thread for getting info on the meaing of the different modes
Now you may either choose to add this job to the queue list, or to start it immediately.
D) Deleting one or more games from the PS2 hdd.
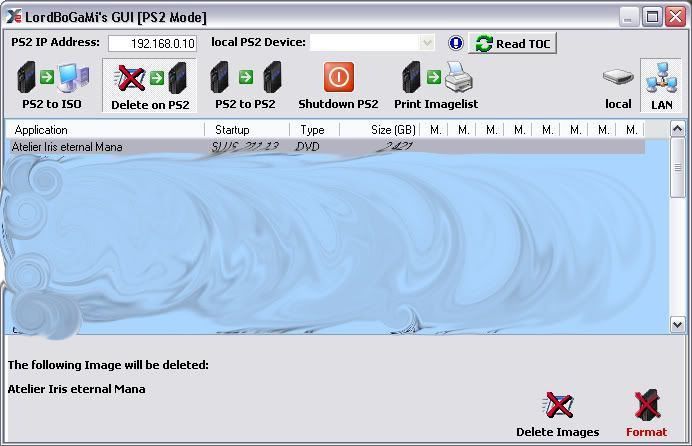
In the main window, click the "work on PS2" button.
now click "Delete on PS2"
Select either "local device" (hdd attached over USB/IDE) or "LAN" (for network communication. The hdl server must be running on PS2!)
hit the green "Refresh TOC" button. Your game list will appear.
Click the game you want to get rid of. If you need to delete more than one, simply hold down the "Ctrl" key on your keyboard and select your games.
After you've selected the game(s) you want to delete, click on the "Delete Images" button in the lower right corner.
E) Copying games form one PS2 hdd to another PS2 hdd.
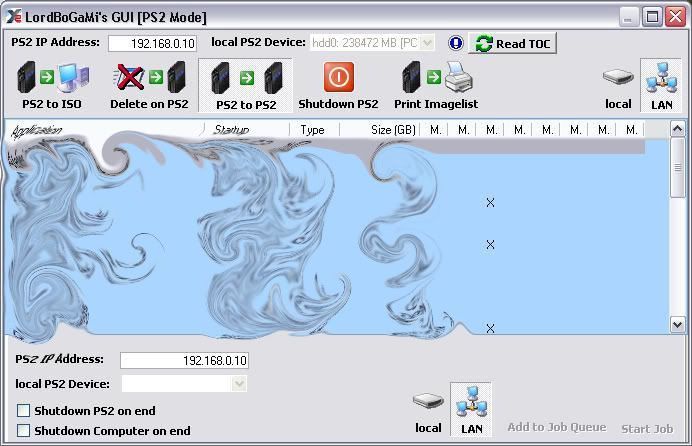
In the smart start window, click "Work on PS2"
Click the "PS2 to PS2" tab
In the upper right corner you can select the source drive. It may be LAN or local ( IDE/USB)
if you have more than one PS2 hdd attached to your PC, you may choose the one you need from the "local PS2 device" dropdown menu
Quote:
For "LAN", don't forget to check the IP address" (UPPER PS2 IP Address filed for SOURCE device)
At the bottom of the window, you can choose the target device. Again it's LAN or local.
Quote:
For "LAN", don't forget to check the IP address" (LOWER PS2 IP Address filed for TARGET device)
hit the green "Refresh TOC" button. Your game list (SOURCE DRIVE!) will appear.
Click the game you want to copy to the other drive. If you need to delete more than one, simply hold down the "Ctrl" key on your keyboard and select your games.
Again you can either choose to add the job to the queue list or start it immediately.
F) Copy a game from PS2 to PC.
In the smart start window, click "Work on PS2"
click "ps2 to ISO"
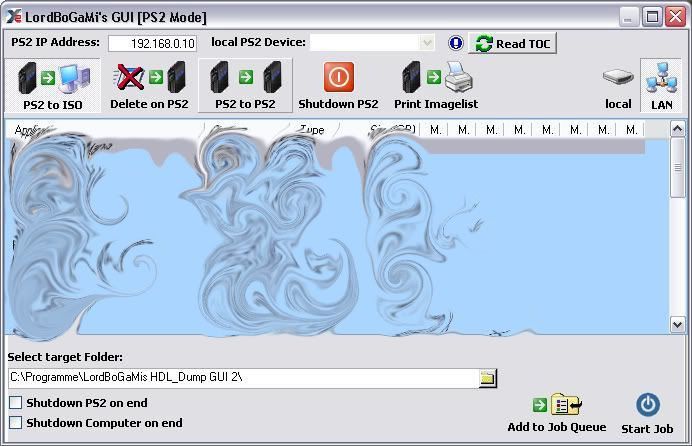
Basically it's the same procedure as shown above,
the only difference is that now you have a "target Folder" at the bottom of the screen..
That's your ISO's destination path!
G) The Jobs in the QueueList
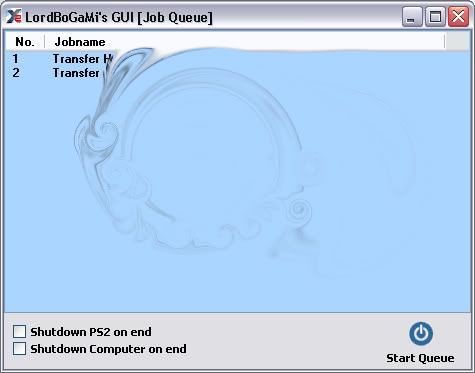
If you have jobs in your QueueList open it either
by hitting the "Open Job Queue" button in the smart start window,
or
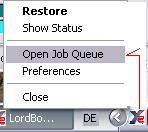
by right-clicking the LordBogami's icon in your system tray and choosing "open Job Queue"
. |
|
 川公网安备 51019002005286号